Web servers host the Flexxible|SUITE web console and should be dedicated machines, since Flexxible|SUITE can restart the Internet Information Services under some circumstances, such as a version update and this would affect other web applications.
Hardware requirements
Depending on the number of simultaneous console users (operators) a different number of balanced web servers is recommended as shown in the following table:
| Number of web servers |
|
| Max concurrent users | (4 vCPUs, 8 GB RAM) |
| 40 | 2 |
| 100 | 4 |
| 200 | 6 |
| 400 | 10 |
| >400 | Custom design |
Please note that the number of users refers to the Flexxible|SUITE Web console operators, not the individual users that might use the platform for virtual desktops or applications.
These values represent just guidelines to dimension an installation of Flexxible|SUITE. The real amount of work to handle is particular to every installation and dynamic over time. It will be affected by many factors like:
- the number of console operators and the layout of operator roles
- the global volume of data to display: number of user sessions, VMs, applications, and console activity.
- the frequency with which VDIClient service reports health and status information and the retention of history tables. Near real-time status and big history tables require more power to be processed.
Software requirements
Operating system
Microsoft Windows Server 2016 Datacenter Core is advised, although Windows Server 2012 R2 or later is supported.
Note: if you are going to work with Citrix DaaS in your Flexxible|SUITE installation, you can't use a Windows Server Core edition, since the Citrix Remote PowerShell SDK requires it.
Windows features/roles
Active Directory Powershell module
Enable the needed Windows features by executing the following Powershell fragment:
$Features =
"NET-Framework-45-Core",
"NET-Framework-Core",
"Web-Server",
"NLB",
"Web-Default-Doc",
"Web-Dir-Browsing",
"Web-Http-Errors",
"Web-Static-Content",
"Web-Http-Redirect",
"Web-Net-Ext",
"Web-Net-Ext45",
"Web-ASP",
"Web-Asp-Net",
"Web-ISAPI-Ext",
"Web-ISAPI-Filter",
"Web-Includes",
"Web-Mgmt-Console",
"Web-Metabase",
"Web-Windows-Auth",
"Web-Basic-Auth",
"RSAT-AD-PowerShell",
"Web-Asp-Net45",
"Web-Mgmt-Service"

foreach ($Feature in $Features) {
    Write-Host "Instalando $Feature" -f Yellow
    if (!(Get-WindowsFeature $Feature).Installed) {
        Install-WindowsFeature $Feature -IncludeManagementTools -Source D:\sources\sxs
    }
}
Windows firewall
Several Windows firewall rules must be enabled or created. To do it execute the following PowerShell fragment:
New-NetFirewallRule -DisplayName "FLX - 80" -Direction Inbound -Protocol TCP -LocalPort 80 -Action Allow
New-NetFirewallRule -DisplayName "FLX - WDeploy" -Direction Inbound -Protocol TCP -LocalPort 8172 -Action Allow
New-NetFirewallRule -DisplayName "VDICLIENT-TCP-INBOUND" -Direction Inbound -Protocol TCP -LocalPort 1236,1237 -Action Allow
Get-NetFirewallRule | ? {$_.DisplayName -like "*File*"} | Set-NetFirewallRule -Enabled true
Get-NetFirewallRule | ? {$_.DisplayName -like "*Windows Management Instru*"} | Set-NetFirewallRule -Enabled true
Get-NetFirewallRule | ? {$_.DisplayName -like "*Remote Desktop*"} | Set-NetFirewallRule -Enabled true
Get-NetFirewallRule | ? {$_.DisplayName -like "*Remote Event Log Management*"} | Set-NetFirewallRule -Enabled true
Get-NetFirewallRule | ? {$_.DisplayName -like "*Remote Service Management*"} | Set-NetFirewallRule -Enabled true
Get-NetFirewallRule | ? {$_.DisplayName -like "*Remote Volume Management*"} | Set-NetFirewallRule -Enabled true
Get-NetFirewallRule | ? {$_.DisplayName -like "*Windows Firewall Remote Management*"} | Set-NetFirewallRule -Enabled true
Get-NetFirewallRule | ? {$_.DisplayName -like "*Remote Scheduled Tasks Management*"} | Set-NetFirewallRule -Enabled true
Internet connection
Flexxible|SUITE can use many services that require access to the Internet (Azure, Citrix DaaS, etc.)
In this scenario, please check that Flexxible Workers have a direct connection to the Internet or configure the proxy settings if needed.
Enable TLS 1.2
[Net.ServicePointManager]::SecurityProtocol = [Net.SecurityProtocolType]::Tls12
gMSA Account
An Active Directory Group Managed Service Account should be created for the machine, so there is no need to worry about password management and expiration.
Note: if you can't use gMSAs, a conventional account can also be used as the identity for the Flexxible|SUITE services, and the password should be updated according to the expiration policy.
The sample scripts in this document assume that you are using a gMSA account.
Once the account is created, it must be installed.
To know the name of the gMSA assigned to the server execute the following PowerShell:
$MSAToThisVM = (Get-ADServiceAccount -Filter * -Properties * | ? {$_.PrincipalsAllowedToRetrieveManagedPassword -like "*$env:COMPUTERNAME*"}).NameOr, if you already know the account name:
$MSAToThisVM = "MSA_Name"
Then install the gMSA account:
Install-ADServiceAccount $MSAToThisVM
Permissions
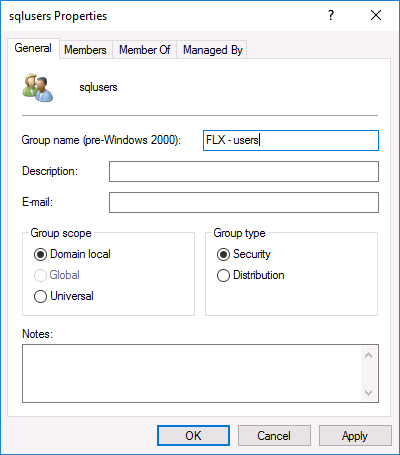
The VDIManagerUsers group should be added to the local IIS_Users group on each web server.
This group should be created previously on AD and is not necessary to add any members because Flexxible|SUITE will manage this group automatically. This group ensures better performance on the web in certain cases.
The group scope must be Domain local in multi-domain environments. Please, refer to the Activity Directory Security Groups article.
This group must be set up in the VDIManagerUsers setting.
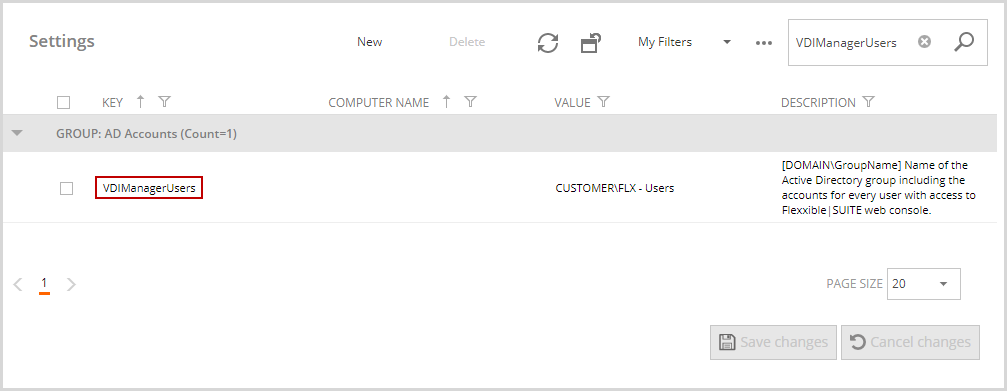
You can configure the setting as ignore to ignore the action of adding the suite users to the VDIManagerUsers group.
Temp folder
To host diagnostic log files produced by Flexxible|SUITE, create a c:\temp folder:
if (!(Test-Path C:\temp)) {New-Item C:\temp -ItemType Directory}The files generated in this folder are automatically deleted after a time.
Microsoft Web deploy
The Microsoft Web Deployment Tools can be downloaded from https://www.microsoft.com/en-us/download/details.aspx?id=43717.
Install it with the "Complete" installation option and the default options.
IIS URL Rewrite module
The Microsoft IIS URL Rewrite Module can be downloaded from https://www.microsoft.com/en-us/download/details.aspx?id=47337.
Install it with the default options.
Group policies
The following group policies must be created and applied to the OU containing the computer account:
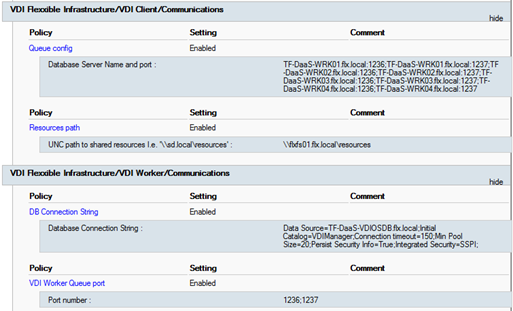
Configuration - VDIClient settings
This group policy enables connectivity with the rest of the Flexxible|SUITE VCC roles, and should define the following settings and values:
Queue config
Contains an inventory of VCC Worker roles, in the form of a semicolon-separated list of FQDNs (or IPv4 addresses) and ports where the Flexxible|SUITE Queue listener service is installed and listening:
Worker01.domain.local:1236; Worker01.domain.local:1237; Worker02.domain.local:1236; Worker02.domain.local:1237
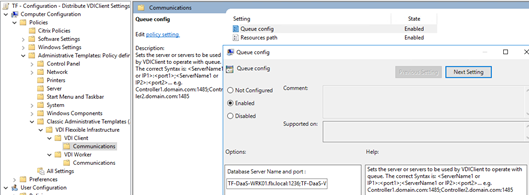
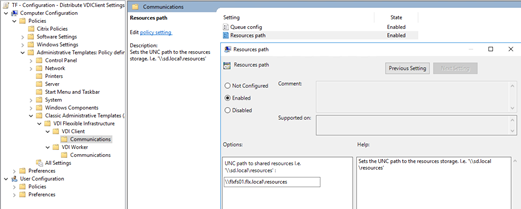
Resources path
The root UNC path for the Flexxible|SUITE resources repository:
\\FS01.domain.local\resources
Configuration - VDIWorker settings
This group policy enables connectivity with the rest of the Flexxible|SUITE VCC roles and with the database, and should define the following settings and values:
DB connection string
The connection string to the VDIManager database, which is the Flexxible|SUITE database:
Data Source=AlwaysOnListener.domain.local;Initial Catalog=VDIManager;Persist Security Info=True;Integrated Security=SSPI;MultiSubnetFailover=Yes;
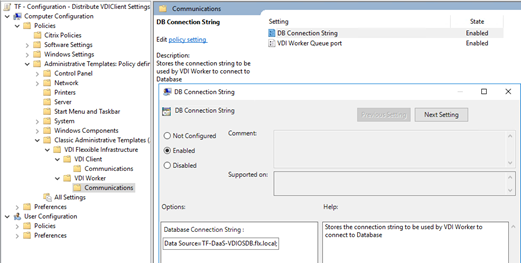
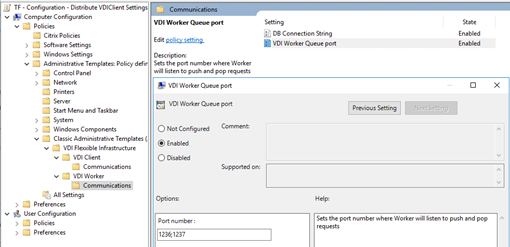
VDI Worker Queue Port
The semicolon-separated list of TCP ports that the Flexxible|SUITE Queue Listener service is listening to. Coordination messages of the different SUITE components are transmitted using these ports:
1236;1237
Once these group policies are defined, they should look similar to this example:
VDIClient service
The VDIClient service allows the supervision and management of the worker machine by Flexxible|SUITE.
To install it, execute the Setup.exe file from the resources path subfolder Clients\Installers\VDIClientService and use the default options.
Citrix Virtual Apps & Desktops snapins
These snapins allow the Flexxible|SUITE web console to work with Citrix Virtual Apps & Desktops.
If your Flexxible|SUITE installation is exclusively connecting to on-premise Citrix Virtual Apps & Desktops installations, you can use the snapins found in the Citrix Virtual Apps & Desktops DVD or .ISO, in the x64\Citrix Desktop Delivery Controller folder:
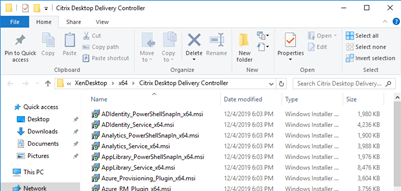
Please use the snapins from the newest version among the Citrix Virtual Apps & Desktops farms that you are planning to use.
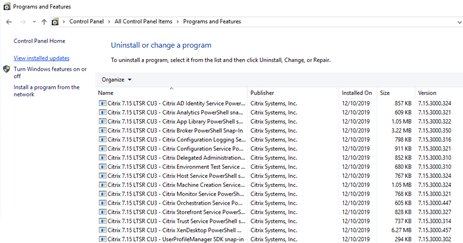
Every .msi file containing the "Snapin" word in the name must be installed by double-clicking it.
Once the snapins are installed, they should appear in the Windows "Programs and Features" dialog:
On the other hand, if your Flexxible|SUITE installation will work with at least one Citrix DaaS broker farm, then you must install the Citrix Remote PowerShell SDK (you can download it from https://download.apps.cloud.com/CitrixPoshSdk.exe) to allow Flexxible|SUITE to work with Citrix DaaS and with on-premise installations of Citrix Virtual Apps & Desktops.
Please, be aware that the Citrix Remote Powershell SDK does not support Windows Server Core editions.
Install Tahoma TrueType font
If you installed a Windows Server Core version, the Tahoma TrueType font might not be present in the %windir%\Fonts folder and this would produce errors when trying to export information from Flexxible|SUITE to other formats, like Microsoft Excel.
To solve this issue you should:
- Get the tahoma.ttf and tahomabd.ttf files from a non-core Windows installation and copy them in the %windir%\Fonts folder.
- Execute the following PowerShell fragment to register the copied fonts
$RegistryPath = "HKLM:\SOFTWARE\Microsoft\Windows NT\CurrentVersion\Fonts"
New-ItemProperty -Path $RegistryPath -Name "Tahoma (TrueType)" -Value "tahoma.ttf" -PropertyType String -Force
New-ItemProperty -Path $RegistryPath -Name "Tahoma Bold (TrueType)" -Value "tahomabd.ttf" -PropertyType String -Force
Web site configuration
- Enable the remote administration by executing:
Set-ItemProperty -Path HKLM:\SOFTWARE\Microsoft\WebManagement\Server -Name EnableRemoteManagement -Value 1
Set-Service -name WMSVC -StartupType Automatic
Start-service WMSVC
- Create the Flexxible|SUITE web console folder:
$SuitePath = "C:\inetpub\wwwroot\VDIManager"
New-Item $SuitePath -ItemType Directory
- Create the Application Pool:
$MSAToThisVM = (Get-ADServiceAccount -Filter * -Properties * | ? {$_.PrincipalsAllowedToRetrieveManagedPassword -like "*$env:COMPUTERNAME*"}).Name # Get MSA os gMSA account installed in Web Server
$MSA = $env:USERDOMAIN+"\$MSAToThisVM"+'$' # Define MSA or gMSA Account
$appPool = New-WebAppPool 'VDIManager' # Create Application Pool
$appPool.managedRuntimeVersion = 'v4.0' # Set Application Pool to use .NET Framework 4.0
$appPool.managedPipelineMode = 0 # Set to use Integrated pipeline mode
$appPool.processModel.loadUserProfile = 1 # Set LoadUserProfile setting to true
$appPool.processModel.identityType = 3 # Set Application Pool to use a specific user or custom account
$appPool.processModel.username = $MSA # Set MSA or gMSA account as identity for Application Pool
$appPool.processModel.password = '' # Set blank password as usually when using MSA or gMSA accounts
$appPool.startMode = "alwaysrunning" # Set start mode as AlwaysRunning
$appPool | Set-Item # Commit al changes
$appPool.Stop() # Stop Application Pool
$appPool.Start() # Start Application Pool
New-WebApplication -Site 'Default Web Site' -Name 'VDIManager' -PhysicalPath $SuitePath -ApplicationPool 'VDIManager' # Create Web Application- Extract the Flexxible|SUITE web console content files and binaries from the installation media, by selecting the VDIManager folder contents (including files and subfolders) and copying it to the created folder: c:\inetput\wwwroot\VDIManager
- Configure the site authentication:
$ErrorActionPreference = 'Stop'
$appCmd = 'C:\windows\system32\inetsrv\appcmd.exe'
& $appCmd unlock config -section:"system.webServer/security/authentication/anonymousAuthentication" -commit:apphost
& $appCmd unlock config -section:"system.webServer/security/authentication/windowsAuthentication" -commit:apphost
$ErrorActionPreference = 'Continue'
$site = 'Default Web Site/VDIManager'
Set-WebConfigurationProperty -Filter "/system.webServer/security/authentication/AnonymousAuthentication" -Name Enabled -Value True -location $site
Set-WebConfigurationProperty -Filter "/system.webServer/security/authentication/BasicAuthentication" -Name Enabled -Value False -location $site
- Configure authentication method. The method should match the one specified by the "WebConsoleAuthentication" setting. You can create a different setting for each IIS server machine with different values, and configure the corresponding IIS server with the appropriate authentication method:
- Integrated Windows authentication:
Set-WebConfigurationProperty -Filter "/system.webServer/security/authentication/WindowsAuthentication" -Name Enabled -Value True -location $site
- Forms authentication:
Set-WebConfigurationProperty -Filter "/system.webServer/security/authentication/WindowsAuthentication" -Name Enabled -Value False -location $site
$appCmd = 'C:\windows\system32\inetsrv\appcmd.exe'
& $appcmd set config "Default Web Site/VDIManager" -section:system.web/identity /impersonate:"False"
$config = (Get-WebConfiguration system.web/authentication "IIS:\sites\Default Web Site\VDIManager")
$config.mode = "Forms"
$config | Set-WebConfiguration system.web/authentication
Set-location C:\
- Configure the session timeout:
Import-Module webadministration
Set-ItemProperty IIS:\AppPools\vdimanager -name processModel -value @{idletimeout=(New-TimeSpan -Minutes 480).ToString()}