Intro
The network scanner service allows, through a locally installed scanner and with the functionality of sending documents via FTP, to automatically send the scanned documents to the folder defined for that scanner within the client NAS.
This document explains how to configure this service at the tenant level and how its architecture and parameterization work.
Tenant configuration
The network scanners service is only configurable at the tenant level. So, this functionality is not compatible with installations without tenants (e.g. the former Flexxible IT product "Enterprise").
For this service to work, the tenant must have the main storage configured on its “Storage” tab, in its view at the Tenants area. The service will automatically create the folders configured in the default storage (the one in bold).

To set this functionality up in the current tenant detail screen we need to go to the "Network scanners" tab, where we can find the following fields:
- Network scanners destination URL: FTP address where the local scanner must transfer the files to.
- Max Transfer (KB/S): Maximum file upload speed.
- FTP Users list: the list (grid) of configured FTP users and the folder where their files will be copied to.
- Notes: In case of a configuration error, this field will show that error detail.
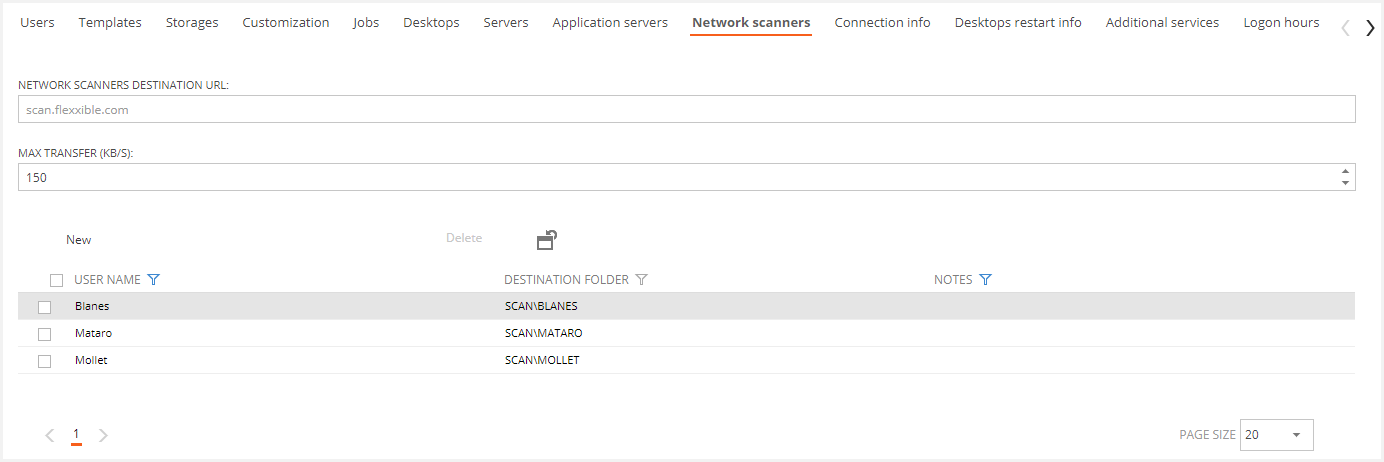
The service allows you to configure as many users as you want and each of them can be linked to a different folder. So, if a client has more than one scanner, you can configure each of them with a different user and the scans will transfer the files to the proper folders.
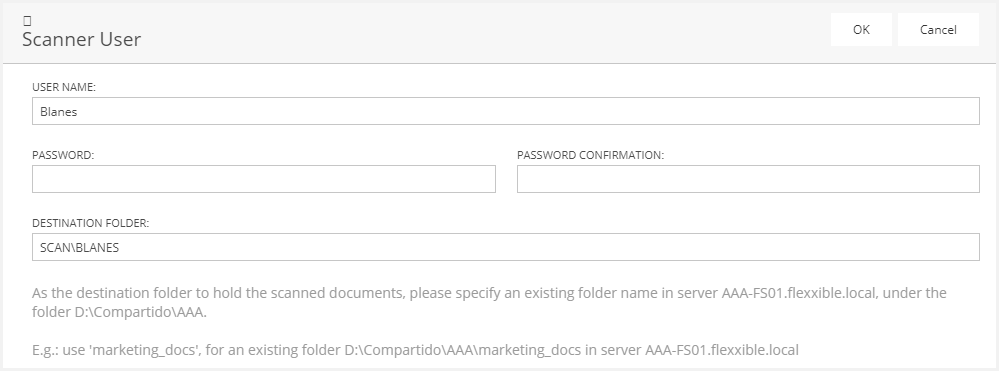
When creating these users we are requested for the following information:
- User name: Name of the FTP user
- Password: Password to login the FTP user
- Password confirmation: Password verification
- Destination folder: Folder inside the main storage of the tenant (in bold, at the above list) where the files uploaded by this user will be transferred to.
The changes made in the network scanner configuration will not apply until a “Tenant initialize” action is performed.
Service configuration and parameterization
The Network scanner service works with an FTP server, where the files scanned by the users are uploaded to.
These files are uploaded to a separate folder, one for each FTP user configured at the tenant level. Once a file is uploaded, the active instance of the VDIWorkerActiveDirectory service is responsible for moving it to the tenant private folder.
This service architecture is as follows:
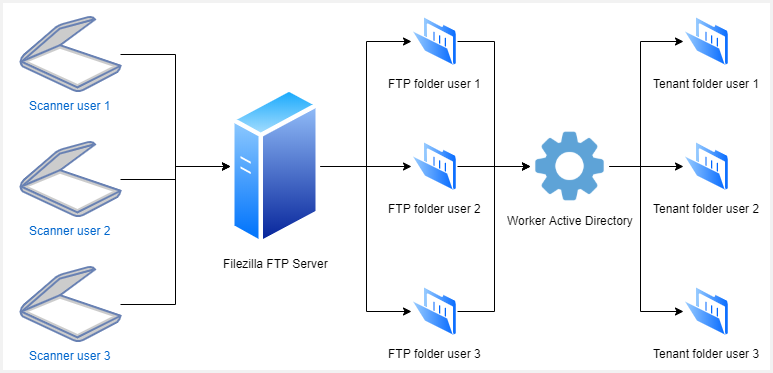
How does this service work:
When a tenant performs a “Tenant initialize” action and Flexxible|SUITE has pending changes to configure at network scanner level, the next actions are run:
- To create the network scanner folder inside the defined storage.
- To create a folder for the tenant in the Filezilla server and inside that folder one more for each FTP user.
- To configure at Filezilla:
- A user group for this tenant to be able to limit the upload bandwidth.
- To created or update in Filezilla the FTP users configured in the tenant.
- To configure the FTP users to save the files in their corresponding folder in the FTP server.
- To reload the Filezilla server configuration to load de new configuration.
Once the tenant is initialized, the users can be configured in the local scanners and start transferring files.
At this point, the Worker active directory will move the files uploaded to the FTP user folders to the tenant storage folder.
This service can monitor and copy until 15 files simultaneously. So, if the requested amount of files to be uploaded is higher than that, the exceeding ones will be enqueued and moved successively.
The worker role Active Directory service works in an Active/Passive configuration. So, the files will be moved by the active instance of the service.
If a file fails to be moved to the tenant folder, the system will send a mail to the mail account informed in the setting “HA_AlertRecipientTo” alerting about the problem.
To diagnose problems, this service generates a NetworkScanner_YYYYMMDD.log file in the "c:\temp" path of the server, where the service is installed.
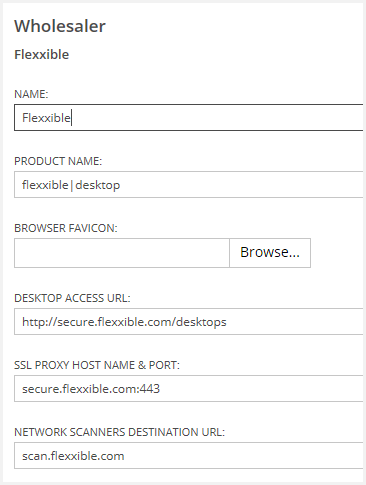
To enable this service is necessary to:
- At the Wholesaler level, to configure the URL that will be shown inside the tenant as the FTP address.
- At the Settings area on the Tenant Manager group you must set up the following settings:
- FTPConfigPath: This path sets where is stored the configuration file of the Filezilla server.
- LocalFTPDestination: Local path inside the FTP server where the network scanner user folders will be created and the files uploaded.
- Local FTPSource: UNC path to access remotely to the files uploaded by the FTP server. This folder is secure to only be accessed from the own Filezilla server or the worker role Active Directory service.